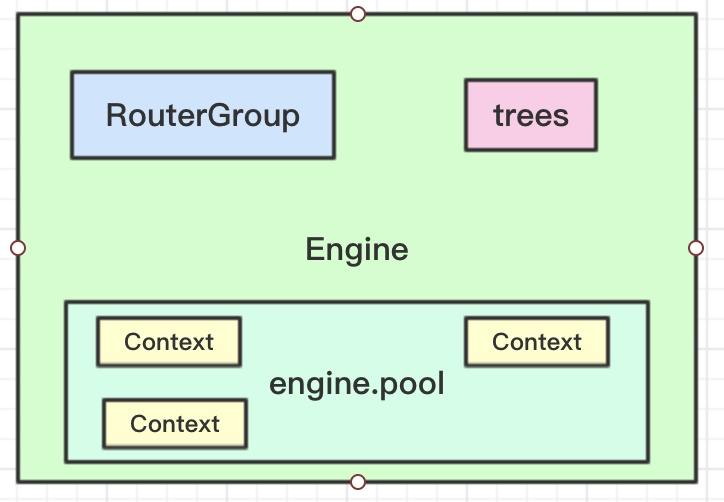
整体结构认识
gin框架处理请求的入口函数ServeHTTP:
1 2 3 4 5 6 7 8 9 10 11 12 13 func (engine *Engine) c := engine.pool.Get().(*Context) c.writermem.reset(w) c.Request = req c.reset() engine.handleHTTPRequest(c) engine.pool.Put(c) }
为减少gc重复回收, 这里使用sync.pool管理自定义Context对象
将请求reqeust数据copy到Context对象中, 通过Context进行管理
调用engine.handleHTTPRequest 进行路由分发
在这里引入自定义的Context对象, 其主要是用来管理数据流转过程时的,上下文数据, 比如response, request, 请求参数params,路径fullpath, 查询缓存, 错误管理, 主要的目的是:避免重复复制数据。
保证数据的一致性。这是gin最重要的数据结构体
处理 handleHTTPRequest
1
2
3
4
5
6
7
8
9
10
11
12
13
14
15
16
17
18
19
20
21
22
23
24
25
26
27
28
29
30
31
32
33
34
35
36
37
38
39
40
41
42
43
44
45
46
47
48
49
50
51
52
53
54
55
56
57
58
59
60
61
62
func (engine *Engine) httpMethod := c.Request.Method rPath := c.Request.URL.Path unescape := false if engine.UseRawPath && len (c.Request.URL.RawPath) > 0 { rPath = c.Request.URL.RawPath unescape = engine.UnescapePathValues } if engine.RemoveExtraSlash { rPath = cleanPath(rPath) } t := engine.trees for i, tl := 0 , len (t); i < tl; i++ { if t[i].method != httpMethod { continue } root := t[i].root value := root.getValue(rPath, c.params, unescape) if value.params != nil { c.Params = *value.params } if value.handlers != nil { c.handlers = value.handlers c.fullPath = value.fullPath c.Next() c.writermem.WriteHeaderNow() return } if httpMethod != "CONNECT" && rPath != "/" { if value.tsr && engine.RedirectTrailingSlash { redirectTrailingSlash(c) return } if engine.RedirectFixedPath && redirectFixedPath(c, root, engine.RedirectFixedPath) { return } } break } if engine.HandleMethodNotAllowed { for _, tree := range engine.trees { if tree.method == httpMethod { continue } if value := tree.root.getValue(rPath, nil , unescape); value.handlers != nil { c.handlers = engine.allNoMethod serveError(c, http.StatusMethodNotAllowed, default405Body) return } } } c.handlers = engine.allNoRoute serveError(c, http.StatusNotFound, default404Body) }
核心代码
1 2 3 4 5 value := root.getValue(rPath, c.Params, unescape) c.Next()
c.Next()方法,这个方法的核心,主要是方便接入中间件(Middleware),使得代码模块化操作。
看下Next的具体实现
1
2
3
4
5
6
7
8
func (c *Context) c.index++ for c.index < int8 (len (c.handlers)) { c.handlers[c.index](c) c.index++ } }
这里的Next设计非常有意思。以下是我给出的一个例子
1
2
3
4
5
6
7
8
9
10
11
12
13
14
15
16
17
18
19
20
21
22
23
24
25
26
27
28
29
30
31
32
33
34
35
36
37
38
39
40
41
42
43
44
45
46
47
48
49
50
51
52
53
54
55
56
57
package mainimport "fmt" type Context struct { handles []func (c *Context) index int8 } func (this *Context) func (c *Context) this.handles = append (this.handles, f) } func (this *Context) string , f func (c *Context) this.handles = append (this.handles, f) } func (this *Context) this.index++ this.handles[this.index](this) } func (this *Context) this.handles[0 ](this) } func Middleware1 () func (c *Context) return func (c *Context) fmt.Println("middleware start" ) c.Next() fmt.Println("middleware end" ) } } func Middleware2 () func (c *Context) return func (c *Context) fmt.Println("middleware2 start" ) c.Next() fmt.Println("middleware2 end" ) } } func main () c := &Context{} c.Use(Middleware1()) c.Use(Middleware2()) c.Get("/" , func (c *Context) fmt.Println("Get handle func " ) }, ) c.Run() }
创建一个Context结构体
调用Use方法,将中间件函数添加到handles中
调用Get方法,将路由函数添加到handles中
调用Run方法,执行第一个函数
执行第一个函数,打印middleware start,然后调用Next方法
Next方法中,index++,此时index为1,然后执行handles[1],也就是第二个函数
执行第二个函数,打印middleware2 start,然后调用Next方法
Next方法中,index++,此时index为2,然后执行handles[2],也就是第三个函数
执行第三个函数,打印Get handle func
执行完毕,返回到第二个函数,打印middleware2 end
返回到第一个函数,打印middleware end
其调用关系
处理函数有先后执行关系, 并且处理函数可以通过调用Abort方法, 提前返回,不用递归调用到实际处理函数。
路由匹配 路由匹配是由节点的 getValue方法实现的。getValue根据给定的路径(键)返回nodeValue值,保存注册的处理函数和匹配到的路径参数数据。
gin框架涉及中间件相关有4个常用的方法,它们分别是c.Next()、c.Abort()、c.Set()、c.Get()。
中间件的注册
gin框架中的中间件设计很巧妙,从最常用的r := gin.Default()的Default函数开始看,它内部构造一个新的engine之后就通过Use()函数注册了Logger中间件和Recovery中间件:
1
2
3
4
5
6
func Default () debugPrintWARNINGDefault() engine := New() engine.Use(Logger(), Recovery()) return engine }
Use() 函数
1
2
3
4
5
6
func (engine *Engine) engine.RouterGroup.Use(middleware...) engine.rebuild404Handlers() engine.rebuild405Handlers() return engine }
注册中间件其实就是将中间件函数追加到group.Handlers中:
1 2 3 4 5 func (group *RouterGroup) group.Handlers = append (group.Handlers, middleware...) return group.returnObj() }
而我们注册路由时会将对应路由的函数和之前的中间件函数结合到一起:
1
2
3
4
5
6
func (group *RouterGroup) string , handlers HandlersChain) IRoutes { absolutePath := group.calculateAbsolutePath(relativePath) handlers = group.combineHandlers(handlers) group.engine.addRoute(httpMethod, absolutePath, handlers) return group.returnObj() }
1
2
3
4
5
6
7
8
9
10
11
12
13
package mainimport "github.com/gin-gonic/gin" func main () r := gin.Default() r.GET("/ping" , func (c *gin.Context) c.JSON(200 , gin.H{ "message" : "success" , }) }) r.Run() }
所以其实gin的中间件,其实就是Gin定义的一个HandlerFunc
1
2
3
4
5
6
7
8
func (engine *Engine) string ) (err error ) { defer func () address := resolveAddress(addr) debugPrint("Listening and serving HTTP on %s\n" , address) err = http.ListenAndServe(address, engine) return }
Gin 提供了gin.BasicAuth 生成基本认证的中间件
1
2
3
4
5
r := gin.Default() r.Use(gin.BasicAuth(gin.Accounts{ "admin" : "123456" , }))
比如访问的时候 需要用户名和密码
也可对特定的URL进行认证,也就是像这样
1
2
3
4
5
6
7
8
9
10
11
12
func main () r := gin.Default() r.GET("/" , func (c *gin.Context) c.JSON(200 , "首页" ) }) adminGroup := r.Group("/admin" ) adminGroup.Use(gin.BasicAuth(gin.Accounts{ "admin" : "123456" , })) }